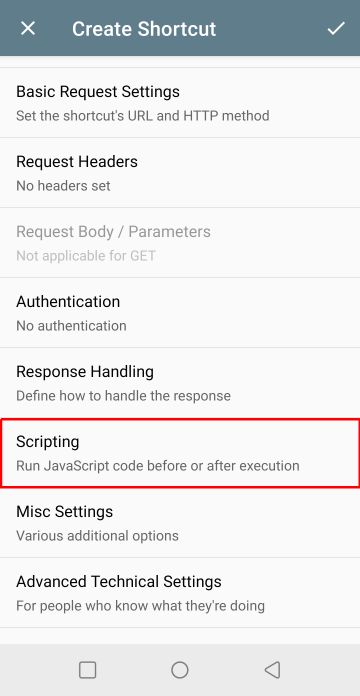
Scripting
When a shortcut is executed it is possible to run JavaScript code snippets before or after execution. You'll find the corresponding settings in the shortcut editor in the "Scripting" section.
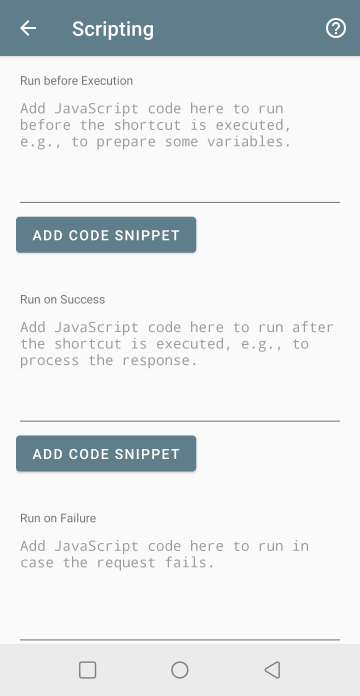
Additionally, you'll find an option in the app's settings (labeled "Global Scripting") that allows you to run code before the execution of every shortcut, which can be used to define shared functions.
Most of JavaScript's built-in functionalities can be used normally, e.g., to manipulate Strings or Arrays. Additionally, the app has some functions and utilities built in for convenience, all of which are documented below.
Using these code blocks, there are a number of things you can achieve. See the examples page for inspiration and some common use-cases.
Pro-tip: Writing code on a phone is tedious. If you're intending to write longer blocks of code, I recommend you check out the Web Editor for more convenient configuration of your shortcuts.
Handling the Response
You can access the response of your HTTP request via the response object.
Please note that the
responseobject is only available in the "Run on Success" code block, as well as in the "Run on Failure" code block in case there was an HTTP response (i.e., a status code of 4xx or 5xx), and will otherwise benull.
Getting the Response Body
The response body is available as a string via response.body.
const myBody = response.body;If you know that the response body is in JSON format, you can use JSON.parse() to turn it into a JS object, array or primitive.
const myJson = JSON.parse(response.body);Getting Response Headers
The response headers are available as an object (key-value-pairs) via response.headers. Each key corresponds to the name of the header and its value is an array of strings of all the headers with that name.
There is also a convenience function response.getHeader(name) which can be used to get the value of a specific header by its name. If there are multiple headers with that name, the last one is returned, and if there are none, null is returned.
const contentType = response.headers['Content-Type'][0];

const contentLength = response.getHeader('Content-Length');
Getting the Status Code
The response's HTTP status code is available as an integer via response.statusCode.
const isNotFound = response.statusCode == 404;Getting Cookies
The response's cookies are available as an object (key-value-pairs) via response.cookies. Each key corresponds to the name of the cookie and its value is an array of strings of all the cookies with that name.
There is also a convenience function response.getCookie(name) which can be used to get the value of a specific cookie by its name. If there are multiple cookies with that name, the last one is returned, and if there are none, null is returned.
const myCookieValue = response.cookies['MyCookieName'][0];

const myCookieValue2 = response.getCookie('MyCookieName2');
If you need more details about a cookie (e.g. its expiration timestamp) you can use response.headers['Set-Cookie'] to read out the cookie headers directly.
Errors
Please note that the response object will be null if there was no response from the server, i.e., in case of a network error. In that case, you can inspect the networkError to get a string describing the error.
Reading & Writing Variables
In the app you can create local and global variables to be used in your shortcuts, e.g. to dynamically insert values for a URL, a query parameter or part of the request body. You'll find the global variable editor via the "Global Variables" option in the menu in the app's main screen.
This section explains how you can interact with these variables from a script.
getVariable
You can access the value of any of your local or global variables via the getVariable() function. Simply pass the variable's name or ID as the first argument.
const myValue = getVariable('myVariable');Please note that the returned value will always be a string. If the variable does not exist an error is raised.
setVariable
You can store a value as a string into a variable via the setVariable() function. Simply pass the variable's name or ID as the first argument and the value you want to store as the second argument.
In the case of a global variable, if its type supports it, the value will be used for the current shortcut execution and will also be stored. In the case of a local variable, the value will only be used for the current execution, as local variables are not persisted.
setVariable('myVariable', 'Hello World');Please note that there is a size limit of 30'000 characters. If you set a value larger than that, it will be used unaltered for the current execution, but the value that is stored will be truncated.
As an optional third argument you can pass a boolean. If it is true, the new value will be stored but not used immediately for the current execution. This is useful for global variables of types which support the 'Remember value' feature (such as Date Input, Time Input, Text Input, etc.) as it allows to change the stored previous value which is used as the default selected value. This argument has no effect for local variables, as they are not persisted.
setVariable('myVariable', 'Hello World', true); // only changes the stored value, but variable will still resolve normally if used afterwardsGetting Information about the Current Shortcut
You can easily retrieve information about the current shortcut and the category it belongs to from the shortcut object. This includes the shortcut's ID, name, description, icon, and whether it is hidden, as well as its category's ID and name.
shortcut.id;
shortcut.name;
shortcut.description;
shortcut.icon;
shortcut.canonicalIcon; // same as icon, but without the color suffix, if there is one
shortcut.hidden;
shortcut.category.id;
shortcut.category.name;
Files
Selected Files
If your shortcut makes use of file parameters or uses the content of a file as the request body then you can access information about these files using the selectedFiles array. Each selected file has an entry, allowing you to read out its file name, size (in bytes), media type and potentially some additional meta information.
const numberOfFiles = selectedFiles.length;

selectedFiles[0].name;
selectedFiles[0].size; // AFTER cropping/rotating
selectedFiles[0].type;
selectedFiles[0].meta;
Each file also has a unique ID, which can be used within the app to uniquely identify the file during the shortcut execution. It is useful if you want to forward these files to another shortcut using the enqueueShortcut function, or if you want to read from a file.
selectedFiles[0].id;

const allFileIds = selectedFiles.map(file => file.id);
The meta field currently only provides information about images and is otherwise an empty object. It allows to read out an image's orientation and the timestamp of when it was created (in "yyyy-MM-dd HH:mm:ss" format):
const myMeta = selectedFiles[0].meta;

/*
myMeta might look like this now:
{
  'created': '2022-12-31 23:59:59',
  'orientation': 1,
}
*/
The orientation field is an integer with the following meaning:
- 0 means no orientation information is available
- 1 means a rotation of 0 degrees, i.e., no adjustment is needed
- 2 means a rotation of 0 degrees, and the image is mirrored
- 3 means a rotation of 180 degrees
- 4 means a rotation of 180 degrees, and the image is mirrored
- 5 means a rotation of 90 degrees
- 6 means a rotation of 90 degrees, and the image is mirrored
- 7 means a rotation of 270 degrees
- 8 means a rotation of 270 degrees, and the image is mirrored
Reading and Writing Files
If you want to read from an existing file or write data to a file, you first need to mount the directory which contains the file. This can be done via the "(Mounted) Directories screen. Once you have a mounted directory, you can use the getDirectory() function to get a handle to it. Pass the name of the mounted directory as the first argument. This handle then lets you read and write files, using the readFile(), writeFile() and appendFile() functions.
For readFiles(), pass the name or path of the file you wish to read from as the first argument, relative to the mounted directory. The file must exist, otherwise an error is raised. As an optional second argument, you can pass the encoding that should be used to read the file, which defaults to UTF-8. The file's entire content is returned as a string.
const dir = getDirectory('myMountedDirectory');
const fileContent = dir.readFile('someDir/someFile.txt');
For writeFile() and appendFile(), pass the name or path of the file you wish to write to as the first argument, relative to the mounted directory. If the file or a directory along its path does not yet exist, it is automatically created.
For
writeFile(), if the file already exists, its contents will be replaced without warning! ForappendFile(), the new content will be appended and the existing file content is preserved.
As the second argument, pass the content you wish to write into the file. If this is an array, Uint8Array or Int8Array, it will be written as bytes. Otherwise, it will be written as a string, using UTF-8 encoding.
const dir = getDirectory('myMountedDirectory');
dir.writeFile('someFile.txt', 'New file content');
dir.appendFile('someFile.txt', [72, 101, 108, 108, 111]);
Reading selected files
The getDirectory function can also be used to read the contents of files that have been selected or shared, i.e., the files listed in selectedFiles. Instead of passing the name or ID of a mounted directory, simply omit the argument. You can then call the readFile() function on the returned object, using either the file name or ID as the first argument.
const dir = getDirectory();
const fileContent = dir.readFile(selectedFiles[0].id);
It is not possible to write to the selected files.
User Interaction
This section describes how you can interact with the user (i.e., you), during the execution of a shortcut, e.g., to ask for additional input, to confirm an action or to display information.
showToast
With this function you can display a toast message on the screen. Simply pass your message as the first argument.
showToast('Hello World');Please note that no toast will be displayed if the string you pass is empty. Also note that a toast will show at most two lines of text, so it is best suited for short messages.
showDialog
With this function you can display a dialog window on the screen. Simply pass your message as the first argument, and optionally a title for the dialog as the second argument. The dialog will be displayed until its "OK" button is pressed.
showDialog('My Message', 'My Title');

showDialog('You can also use <b>basic</b> <i>HTML</i> for formatting the message.');
Please note that no dialog will be displayed if the string you pass is empty.
As an optional third argument, you can pass an object with additional options. Currently, the only supported option is buttons, which is an array of 1-2 strings to customize the buttons displayed on the dialog.
The function returns an object with a result field in it, which resolves to either "ok" (if no custom buttons were defined and the default OK button was clicked), "button1" (if the first custom button was clicked), "button2" (if the second custom button was clicked), or "canceled" (if the dialog was canceled).
const dialogResult = showDialog('My Message', 'My Title', {buttons: ['Yay', 'Oh no']});
if (dialogResult.result == 'button1') {
  alert("Yay!");
}
showWindow
With this function you can display arbitrary text in a fullscreen window, by passing in an object with the configuration for the screen.
The config object supports the following fields:
| Parameter | Description | Type / Values |
|---|---|---|
| title | Defines the title of the window | string |
| text | The main content to display in the window. Must be non-empty | string |
| mimeType | The type of the text, used to determine how to render it. Supported values are "text/plain" (default), "text/html", "text/xml", "text/yaml" and "application/json" |
string |
| monospace | Whether to use a monospace font for the text. Defaults to false |
boolean |
| fontSize | The font size for the text. Must be a value between 5 and 50. | int |
showWindow({
  title: 'This is a window',
  text: 'Hello world',
  fontSize: 18,
});
prompt, confirm
Similar to how JavaScript works in a browser, you can use prompt() and confirm() to ask the user for input as part of a workflow.
prompt() will open a dialog window asking for text input. The entered text is then returned as a string. If the dialog is canceled, null is returned instead. Pass a message in as the first argument, and optionally a second argument to prefill the text input field. As an optional third argument, you may pass an object with additional options. Currently only the multiline option is supported, which when set to true will change the text input field to allow for multiline text.
confirm() will open a confirmation dialog. It returns true if the dialog is confirmed, or false if it is canceled. Pass a message in as the first argument.
if (confirm('Are you sure?')) {
  // Do something only if the user clicked 'OK'
}
const myName = prompt('What is your name?');
prompt("What's your story?", "I was born in...", { multiline: true });promptNumber
You can use the promptNumber function to open an input dialog that asks for a number. The entered number will be the return value, or null if the dialog is canceled. If the entered value is not a valid number NaN will be returned.
See also promptNumberSlider.
As the first argument pass the text to display on the dialog. This must not be empty. As an optional second argument you may pass a default value which is used to prefill the input field.
const myNumber = promptNumber('What is your favorite number?', 42);promptNumberSlider
The promptNumberSlider function opens a dialog window that shows a horizontal number slider widget. The selected number will be the return value, or null if the dialog is canceled.
As the first argument pass an object that may contain the following fields to configure the dialog and the slider:
| Parameter | Description | Type / Values |
|---|---|---|
| title | Defines the title of the dialog | string |
| text | The main content to dialog | string |
| prefix | Text displayed before the number | string |
| suffix | Text displayed after the number | string |
| value | The initially selected value | number |
| min | The minimum value of the slider. Defaults to 0 | number |
| max | The maximum value of the slider. Defaults to 100 | number |
| stepSize | The step size of the slider. Defaults to 1 | number |
const myNumber = promptNumberSlider({
  title: 'Temperature',
  text: 'Select the desired temperature',
  suffix: '°C',
  min: 20,
  max: 35,
  value: 24,
  stepSize: 0.5,
});
promptPassword
The promptPassword() function opens a text input dialog that asks for a password. The entered password is then returned, or null if the dialog is canceled. Pass a message in as the first argument, and optionally a second argument to prefill the text input field.
const myPassword = promptPassword("Please enter your password:");
const myPassword2 = promptPassword("Please enter your password:", "secret123");
promptColor
The promptColor() function opens a color picker. The selected color is returned in hex RGB (e.g. FF0000 for red), or null if the picker is canceled. As an optional first argument you can pass in the pre-selected color. As an optional second argument you can pass a title for the picker dialog.
const myColor = promptColor();
const myColor2 = promptColor("#FF0000");
const myColor3 = promptColor(null, "Pick a color");
If you need the red, green and blue components separately, check out this example.
promptDate
The promptDate() function opens a date picker. The selected date is returned, or null if the picker is canceled. As the first argument, you may pass the date format that should be used for the return value (defaults to yyyy-MM-dd), and as a second argument you may pass the preselected date (in yyyy-MM-dd format). As an optional third argument you can pass a title for the picker dialog.
const myDate = promptDate();
const myDate2 = promptDate("yyyy-MM-dd", "2050-12-31");
const myDate3 = promptDate(null, null, "Pick a date");
promptTime
The promptTime() function opens a time picker. The selected time is returned, or null if the picker is canceled. As the first argument, you may pass the time format that should be used for the return value (defaults to HH:mm), and as a second argument you may pass the preselected time (in HH:mm format). As an optional third argument you can pass a title for the picker dialog.
const myTime = promptTime();
const myTime2 = promptTime("HH/mm", "13:37");
const myTime3 = promptTime(null, null, "Pick a time");
showSelection & showMultiSelection
These functions allows you to display a dialog with multiple options to choose from. The first argument must be either an object consisting of key-value string pairs, or an array of strings. As an optional second argument you may pass a title for the dialog.
For showSelection, a single option can be selected, and the function returns its key or value, or null if the dialog is closed without a selection (e.g. by pressing the back button).
For showMultiSelection, multiple options can be selected and the function returns an array of of the selected keys or values, or null if the dialog is closed without a selection.
// Using an array of strings, for a single selection
const starterPokemon = showSelection(['Bulbasaur', 'Charmander', 'Squirtle']);

// Using an object, for a single selection
const favoriteColor = showSelection({
  '#ff0000': 'Red',
  '#00ff00': 'Green',
  '#0000ff': 'Blue',
}, 'Pick your favorite color');

// Using an array of strings, for multiple selection
const favoriteSeasons = showMultiSelection(['spring', 'summer', 'fall', 'winter']);

// Using an object, for multiple selection
const availableWeekdays = showMultiSelection({
  '0': 'Sunday',
  '1': 'Monday',
  '2': 'Tuesday',
  '3': 'Wednesday',
  '4': 'Thursday',
  '5': 'Friday',
  '6': 'Saturday',
}, 'Weekday availability?');
showNotification
The showNotification() function allows you to display text in a notification. As the first argument, pass the title of the notification and as an optional second argument you can pass a message.
The first time this function is used, you will be prompted to grant the notification permission. If you decline, the function will not do anything. To enable it again, you need to go to the app's permissions settings and grant the notification permission manually.
showNotification('Hello World');
showNotification('Hello World', 'This is a notification');
playSound
With this function you can play a notification sound. If no argument is passed, it will use the system's default notification sound. You can use the Code Snippet picker inside the app to select a different sound.
playSound();speak
With this function you can have a piece of text be read out loud, using the device's text-to-speech engine. Simply pass the text you want to read as the first argument, and optionally a language identifier as the second argument.
Please note that only the first 400 characters will be read. Please also note that the second argument is ignored if the language is not supported.
speak('Hello World');

speak('Dieser Text ist deutsch', 'de');
This function may not be supported by all devices.
vibrate
With this function you can cause the device to vibrate (if supported). As an optional first argument, you can pass the name of the vibration pattern you want to use, and as an optional second argument you can pass a boolean denoting whether the execution should wait for the vibration pattern to finish or not.
Vibration patterns:
| Name | Description |
|---|---|
| short | 1 short pulse. This is the default if no pattern is provided |
| long | 1 long pulse |
| 3 pulses | 3 short pulses |
| click | A very brief, gentle pulse, typically used for haptic feedback of UI elements |
| tick | A very brief, gentle pulse. Less strong than "click" |
| heavy click | A very brief, gentle pulse. Stronger than "click" |
| double click | 2 very brief, gentle pulses |
vibrate("3 pulses", true);
vibrate("click");
scanBarcode
The scanBarcode function lets you scan a barcode (e.g. a QR code). On success the function returns the raw data of the barcode as a string. If the scanner is canceled, null is returned instead.
const code = scanBarcode();The scanning itself is done by an external app, specifically either QR Droid, Barcode Scanner or Binary Eye, which means you need to have that app installed for this function to work. This also means that the HTTP Shortcuts app itself will not need access to your camera directly.
Modify Shortcuts
This section lists all the built-in functions which you can use to modify existing shortcuts programmatically.
renameShortcut
With this function you can rename a shortcut. Simply pass the name or ID of a shortcut as the first argument and the new name as the second one. You can also pass an empty string as the first argument to target the current shortcut.
renameShortcut('Old Name', 'New Name');changeDescription
With this function you can change the description of a shortcut. Simply pass the name or ID of a shortcut as the first argument and the new description as the second one. You can also pass an empty string as the first argument to target the current shortcut.
changeDescription('My Shortcut', 'New Description');A shortcut's description is only visible in categories that use a list layout, not in those that use a grid layout.
changeIcon
With this function you can change the icon of a shortcut. Simply pass the name or ID of a shortcut as the first argument and the name of the icon as the second one. You can also pass an empty string as the first argument to target the current shortcut. Use the "Add Code Snippet" button in the app to select an icon. Alternatively, you can check the source code for all the available icons names (look for the prefix "R.drawable.", everything after it is a valid icon name).
changeIcon('My Shortcut', 'bitsies_lightbulb');
setShortcutHidden
This function allows you to show or hide individual shortcuts inside the app. Simply pass the name or ID of a shortcut as the first argument and true or false as the second argument. You can also pass an empty string as the first argument to target the current shortcut.
setShortcutHidden('My Shortcut', true);You can make hidden shortcuts visible via an option on the Settings screen.
setCategoryHidden
This function allows you to show or hide categories. Simply pass the name or ID of a category as the first argument and true or false as the second argument.
setCategoryHidden('My Category', true);There must always be at least one non-hidden category. If you try to hide the last visible category with this, nothing will happen.
Control Flow
This section lists some of the options you have to control the execution flow of your script.
wait
The wait function allows you to delay execution by waiting (also called sleeping) for a specified number of milliseconds before continuing with the execution of the script.
wait(3000); // delay execution by 3 secondsPlease note that this is a blocking action, meaning that you will not be able to interact with the app during the waiting time.
abort, abortAll and abortAndTreatAsFailure
With the abort function you can abort the execution of the shortcut.
abort();If the shortcut was called from another shortcut via the executeShortcut function, only the current shortcut will be aborted. If you want to abort also the calling shortcut, you can use abortAll().
As part of the "Run on Success" code block, you can also use the abortAndTreatAsFailure() function, which skips the rest of the "success" steps and instead treats the execution as a failure, meaning that the "Run on Failure" code will be run, as well as any other failure-related steps such as displaying an error message. You can use this in cases where the default behavior of only checking the HTTP status code is not enough to determine whether a request should be considered a success. As an optional argument, you can pass a string which will be used as the error message.
// Basic example
abortAndTreatAsFailure();

// More realistic example
const responseBody = JSON.parse(response.body);
if (responseBody.status === 'error') {
  abortAndTreatAsFailure(responseBody.error);
}
Text Processing
This section lists some of the built-in text processing functions.
base64encode and base64decode
With the base64encode and base64decode functions you can encode or decode a given string using Base64.
const encoded = base64encode('Hello world');
const decoded = base64decode(encoded);
The return type of base64encode is a string, the returned value of base64decode is a Uint8Array. You can use toString() to convert it to a string if needed.
htmlEncode and htmlDecode
The htmlEncode function allows you to encode text such that it is HTML-safe, i.e., certain characters will be escaped such that the string can safely be embedded in HTML.
The htmlDecode functions does the opposite, converting HTML encoded text into plain text. This will also strip any HTML tags and replace them with their inner text.
The transformations done by these functions is done on a best-effort basis.
htmlEncode("<b>Hello</b>"); // returns <b>Hello</b>
htmlDecode("<b>Hello</b>"); // returns <b>Hello</b>
htmlDecode("<b>Hello</b>"); // returns Hellohash
With the hash function you can compute the hash of a given string. The first argument denotes the hashing algorithm to use (supported algorithms are MD5, SHA-1, SHA-256, and SHA-512) and the second one the string to hash. The return value is in hex format.
const hashed = hash('SHA-256', 'Hello world');
// the value of `hashed` is '64ec88ca00b268e5ba1a35678a1b5316d212f4f366b2477232534a8aeca37f3c' now.
hmac
With the hmac function you can compute the HMAC of a given message. The first argument denotes the hashing algorithm to use (supported algorithms are MD5, SHA-1, SHA-256, and SHA-512), the second one the secret key, and the third one the message (as a string or byte array) for which to compute the HMAC. The returned value is a Uint8Array.
const myHMAC = hmac('SHA-256', 'my_key123', 'Hello world');
const myHMACasHex = toHexString(myHMAC);
// the value of `myHMACasHex` is '34d60d40202ae16ae3dd70c9715b1900f9fe30cf10af483e74ea8f6bef18bd09' now.
parseHTML
The parseHTML function allows to parse an HTML string into an object representation. Each HTML element is converted into a JS object with attributes name, attributes, children, and text (if any), as is showcased by the following example:
// Given some XML string
const myHTML = `<html lang="de">
  <head>
    <title>Hello World</title>
  </head>
  <body>
    <ul style="color: red">
      <li>Item 1</li>
      <li>Item 2</li>
    </ul>
  </body>
</html>`;

const result = parseHTML(myHTML);

/*
The result variable now holds the following object (blank text fields omitted for clarity):
{
  "name": "html",
  "attributes": {
    "lang": "de"
  },
  "children": [
    {
      "name": "head",
      "attributes": {},
      "children": [
        {
          "name": "title",
          "attributes": {},
           "children": [],
           "text": "Hello World"
        }
      ]
    },
    {
      "name": "body",
      "attributes": {},
      "children": [
        {
          "name": "ul",
          "attributes": {
            "style": "color: red"
          },
          "children": [
            {
              "name": "li",
              "attributes": {},
              "children": [],
              "text": "Item 1"
            },
            {
              "name": "li",
              "attributes": {},
              "children": [],
              "text": "Item 2"
            }
          ]
        }
      ]
    }
  ]
}
*/

// We can now easily extract the parts we're interested in
const title = result.children[0].children[0].text;
As a second argument, you can provide a query to search for and parse only specific parts of the HTML. In this case, the returned value is an array of all found elements. By default, this query string is interpreted as a CSS-style selector, but you can also provide an XPath query by passing the string "xpath" as the third argument.
const myHTML = '...'; // same as in the example above

const result = parseHTML(myHTML, 'ul > li'); // query for all `li` elements which are direct descendants of `ul` elements.

/*
The result variable now holds the following array of objects:
[
  {
    "name": "li",
    "attributes": {},
    "children": [],
    "text": "Item 1"
  },
  {
    "name": "li",
    "attributes": {},
    "children": [],
    "text": "Item 2"
  }
]
*/
In case you're not familiar with CSS selectors, here's some examples:
liwould select all<li>elements.my-classwould select all elements that have the class "my-class"p imgwould select all<img>elements which are within a<p>element (not necessarily as a direct child)a[href]would select all<a>elements which have ahrefattribute[id="my-id"]would select all elements which have theid="my-id"attributeul.my-class > liwould select all<li>elements which are direct child elements of<ul>elements which have the "my-class" class
parseXML
The parseXML function allows to parse an XML string into an object representation. Each XML element is converted into a JS object with attributes name, attributes, children, and text (if any), as is showcased by the following example:
// Given some XML string
const myXML = `<element>
    <foo bar="123">Hello World</foo>
</element>`;

const result = parseXML(myXML);

/*
The result variable now holds the following object:
{
  "name": "element",
  "attributes": {},
  "children": [
    {
      "name": "foo",
      "attributes": {
        "bar": "123"
      },
      "children": [],
      "text": "Hello World"
    }
  ],
  "text": "\n    \n"
}
*/

// We can now easily extract the parts we're interested in
const rootElement = result.name; // will be "element"
const childElement = result.children[0].name; // will be "foo"
const childAttributes = Object.keys(result.children[0].attributes); // will be ["bar"]
const childBarAttribute = result.children[0].attributes.bar; // will be "123"
const childText = result.children[0].text; // will be "Hello World"
toString and toHexString
The functions toString and toHexString can be used to convert a Uint8Array to a string, which is particularly useful in combination with the hmac and base64decode functions.
const myValue = base64decode('SGVsbG8=');
const result = toString(myValue);
// the value of `result` is 'Hello' now.
Network
getWifiIPAddress
With this function you can retrieve the IPv4 address of the device on the current Wi-Fi. It will return null if there is currently no Wi-Fi connection.
const myIP = getWifiIPAddress();getWifiSSID
With this function you can retrieve the SSID (i.e., the name) of the Wi-Fi network the device is currently connected to. It will return null if there is currently no Wi-Fi connection or if the SSID can not be determined.
const mySSID = getWifiSSID();For this function to work, location services need to be enabled and the app needs to be granted the permission to access the device's location. This is a technical limitation imposed by the Android OS. See also the Permissions page for details.
Wake-on-LAN
You can use the wakeOnLan function to send a magic packet to turn on another device on your network. The first argument has to be the MAC-address of the device. As the optional second argument, you can pass the network/broadcast address to be used, and as the third argument you can define the port.
wakeOnLan('01-23-45-67-89-ab');

wakeOnLan('01-23-45-67-89-ab', '255.255.255.255', 9);
Send HTTP request
The sendHttpRequest function allows you to send a simple HTTP request. The first argument is the URL, the second (optional) argument provides an object with additional options. The following fields are supported in the options object:
| Parameter | Description | Type / Values |
|---|---|---|
| method | Defines the HTTP method to use, e.g. "GET" or "POST". Defaults to "GET". | string |
| headers | Additional headers to add to the request, as key-value-pairs. | object |
| body | The body to use in the request, for when you want to send data | string |
| formData | Form parameters to add to the request, as key-value-pairs. Can not be combined with body. |
object |
| charset | Defines which charset to use to decode the response body. If not provided, the charset is derived from the response headers, or falls back to UTF-8 | string |
| followRedirects | Whether to follow HTTP redirects. Enabled by default. | boolean |
The function returns an object which includes a status field, which has the value "success", "httpError" or "networkError". If it is "networkError", you can check the field networkError for details. Otherwise, you can check the response field for the HTTP response object. It includes fields body, headers, cookies and statusCode.
If you need more options, consider creating a dedicated HTTP Shortcut for your request and invoking it using enqueueShortcut or executeShortcut instead.
const result = sendHttpRequest(
  "https://example.com",
  {
    method: "POST",
    body: '{"data": 123}',
    headers: {
      "Content-Type": "application/json",
    },
  },
);

if (result.status == "success") {
  alert(result.response.body);
} else if (result.status == "httpError") {
  alert("Failed with status code " + result.response.statusCode);
} else {
  alert("Failed with network error: " + result.networkError);
}
Send MQTT message
The sendMqttMessages function allows you to connect to an MQTT broker, send (i.e. publish) one or more messages to it, and then disconnect again. The first argument is the URI of the server/broker, the second (optional) argument provides options for the connection (e.g. username and password) and the third argument is an array of all the messages that should be sent.
sendMQTTMessages(
  "tcp://192.168.0.42:1234",
  {"username": "admin", "password": "1234"},
  [
    {"topic": "hallway-lamp/set", "payload": "{\"state\":\"ON\"}"},
    {"topic": "desk-lamp/set", "payload": "{\"state\":\"ON\", \"brightness\": 255}"},
  ]
);
Please note that this does not provide any particular quality of service guarantees, and that it is not possible to subscribe to topics this way, meaning you can't receive any MQTT messages.
If you use SSL, you may also configure the hostname verification by adding additional options to the second argument, to either check for a specific SHA-1 or SHA-5 fingerprint by including the "fingerprint": "AA:AA:..." option, or to just skip hostname verification entirely by including the "verifyHostname": false option. This is mainly only useful when using self-signed certificates, and you should only do this if you know what you are doing.
sendMQTTMessages(
  "ssl://192.168.0.42:1234",
  {"username": "admin", "password": "1234", "fingerprint": "AA:BB:CC:DD:EE:FF:00:11:22:33:44:55:66:77:88:99:AA:BB:CC:DD"},
  [
    {"topic": "my_topic", "payload": "my_payload"},
  ]
);
Send TCP Packet
You can use the sendTCPPacket function to send a TCP packet to another device on your network. This can be useful when interacting with devices that have a telnet interface.
Pass the packet data as the first argument (either as a string, Uint8Array or array of numbers denoting bytes), the target host's name or IP address as the second argument and its TCP port as the third argument.
sendTCPPacket('hello', '192.168.1.42', 1337);

sendTCPPacket([0x68, 0x65, 0x6C, 0x6C, 0x6F], 'example.com', 4242);
If you want to listen for incoming data from the TCP connection, you can specify so by passing in a configuration object as the fourth argument. This object may have the following fields:
read: If set to "text", all incoming data is read as text and returned as a string. If set to "line", only a single line of text is read and returned as a string. If not specified, nothing is read andnullis returned.timeout: The time in milliseconds after which the socket is automatically closed. Must be at most 30000, defaults to 3000. Ifreadis set to "text" and this timeout is hit, all data that was read until that point is returned.charset: The charset that should be used to decode the incoming data. Defaults to UTF-8.
const reply = sendTCPPacket('hello', '192.168.1.42', 1337, {
  read: 'text',
  timeout: 300,
});
Send UDP Packet
You can use the sendUDPPacket function to send a UDP packet to another device on your network. Pass the packet data as the first argument (either as a string, Uint8Array or array of numbers denoting bytes), the target host's name or IP address as the second argument and its UDP port as the third argument.
sendUDPPacket('hello', '192.168.1.42', 1337);

sendUDPPacket([0x68, 0x65, 0x6C, 0x6C, 0x6F], 'example.com', 4242);
Miscellaneous Built-In Functions
This section lists all of the built-in functions which do not fall into a specific category.
enqueueShortcut
With this function you can enqueue a shortcut to execute after the current one (or after the last enqueued one if there are already shortcuts scheduled to execute). Simply pass the name or ID of a shortcut as the first argument.
enqueueShortcut('My Other Shortcut');Optionally you can pass an object as the second argument to provide values for variables. This will not change the stored values of the variables but they will assume the specified value when the other shortcut is executed. This is particularly useful for dynamic variable types (such as "Text Input" or "Multiple Choice Selection").
enqueueShortcut('My Other Shortcut', {
  'My_Variable1': 'Hello World',
  'My_Variable2': ':D',
});
As an optional third argument, you can pass the number of milliseconds by which to delay the execution. This way you can schedule a shortcut to run at a later point in time.
Please note that the delay will not be exact and can not exceed 5 minutes.
enqueueShortcut('My Other Shortcut', null, 2 * 60 * 1000); // runs in 2 minutesNote that the shortcut will only be executed once the current shortcut (and all shortcuts that have been enqueued before it) has finished executing. It will not be executed immediately. If you need the shortcut to run immediately, use executeShortcut instead.
Also note that this might lead to infinite loops if the enqueued shortcut also enqueues shortcuts. To reduce the impact of this in case it happens accidentally, the app will delay every 10th execution by 5 seconds so that you have enough time to stop the execution manually. If you're really sure that you do want an infinite loop, you can work around this protection by setting a delay of at least 500 milliseconds.
cancelShortcut
The cancelShortcut function can be used to cancel the execution of a shortcut, i.e., a shortcut that is enqueued to run at a later point in time, e.g. because it was scheduled with enqueueShortcut, or was configured to run with a delay or to repeat. Pass the ID or name as the first argument.
cancelShortcut('My Repeating Shortcut');executeShortcut
This function allows you to execute another shortcut within the current one and receive its result. Pass the name or ID of a shortcut as the first argument.
executeShortcut('My Other Shortcut');Optionally you can pass an object as the second argument to provide values for variables. This will not change the stored values of the variables but they will assume the specified value when the other shortcut is executed. This is particularly useful for dynamic variable types (such as "Text Input" or "Multiple Choice Selection").
executeShortcut('My Other Shortcut', {
  'My_Variable1': 'Hello World',
  'My_Variable2': ':D',
});
The function will return an object which contains a status field which you can query to see if the shortcut's execution was successful. It may contain the values "success", "failure", "unknown", or "aborted".
- "success" means that the shortcut successfully executed an HTTP request. Its response is returned in the
responsefield, using the same format as theresponseobject that is available for all shortcut executions. - "failure" means that the shortcut's HTTP request failed, either due to a network error or the HTTP status was not 2xx or 3xx. In this case, you can get more information about the failure via the
responsefield or thenetworkErrorfield, one of which is always non-null in this case. - "unknown" means that the shortcut did not (directly) make an HTTP request and therefore has no response. This will happen if the shortcut is not an HTTP shortcut or if the HTTP request was delayed or rescheduled.
- "aborted" means that the
abort()function was called
const result = executeShortcut('My Other Shortcut');
if (result.status === 'success') {
  const body = result.response.body;
  alert(body);
} else if (result.status === 'failure') {
  if (result.networkError) {
    alert(result.networkError);
  } else {
    alert(result.response.body);
  }
}
Please note the following technical limitations:
- A shortcut that is executed this way cannot display its response in a fullscreen window. If you need to display its response, please change the response display type to use a toast or dialog window instead.
- A shortcut that is executed this way shares the resolution of variable values with the original, i.e., calling shortcut. This means that if you have e.g. a multiple choice variable that is used in both of the shortcuts, you will be prompted to select a value only once (not twice) and the selected value will be used for both shortcut executions.
- There is a maximum recursion depth of 3, meaning that you can not arbitrarily nest shortcut executions within shortcut executions. This is to prevent infinite recursion and stack overflows. If you want to chain more shortcuts together, consider using enqueueShortcut().
Passing data back
If you wish to pass data from the called shortcut to the calling shortcut, you can either do this by storing values into global variables (using setVariable()) in the called shortcut and then reading those values in the calling shortcut (using getVariable()), or you can use the setResult function. The latter accepts a single string argument. This string can then be accessed by the calling shortcut on the object returned by the executeShortcut function via its result key.
// What the called shortcut does:
setResult('Hello World');

// What the calling shortcut does:
const resultObject = executeShortcut('My other shortcut');
const myResult = resultObject.result; // will now have the value "Hello World"
This same mechanism also allows passing data back to Tasker in the case where the shortcut was triggered from Tasker.
Forwarding Files
When executing or enqueuing another shortcut, it is possible to forward one or more selected files to it. This can be useful if you have a shortcut that uses a file in a form parameter or its request body, and you want to use the same file also for another shortcut to include in another request. To do this, pass the IDs of the files in via the special $files variable. You can pass either a single file ID or an array of file IDs, as shown in the following examples:
// Pass a single file
enqueueShortcut('My Other Shortcut', {
  '$files': selectedFiles[0].id,
});

// Pass 2 files
enqueueShortcut('My Other Shortcut', {
  '$files': [selectedFiles[0].id, selectedFiles[1].id],
});

// Pass all files
enqueueShortcut('My Other Shortcut', {
  '$files': selectedFiles.map(file => file.id),
});
This mechanism works both for the enqueueShortcut and the executeShortcut function.
Log Event
The logEvent function allows you to log custom events into the Event History (which you'll find by selecting "Trouble Shooting" in the app's main menu). This can be used for debugging and troubleshooting. Pass an event title as the first argument and optionally a message with details as the second argument.
logEvent('Hello World');

logEvent('My title', 'My message');

logEvent('My complex event', {'foo': 'bar'});
Get Device ID
When first opened, the app generates a random device ID, consisting of letters and digits. The getDeviceId function can be used to read this ID. This is mainly useful in cases where you use the same shortcut on multiple devices and need to differentiate the devices somehow.
const myId = getDeviceId();Generate UUID
You can use the uuidv4() function to generate a random UUID (Universal Unique Identifier, version 4). The returned value is of type string.
const myUUID = uuidv4();Get Clipboard Content
The getClipboardContent function allows you to query the latest item in your device's clipboard, i.e., the last piece of text that you copied from somewhere. If there is nothing in the clipboard or if its content is not text (e.g., if you copied an image instead), this function will return null instead.
const clipboardValue = getClipboardContent();This function can not be used when executing shortcuts in the background, as the Android OS (starting from Android 10) does not allow apps in the background to access the clipboard. In this case the function will return
null.
Copy to the Clipboard
With the copyToClipboard function you can copy a value to the device's clipboard. Simply pass the value you want to copy as the first argument.
copyToClipboard('Hello World');This function can not be used when executing shortcuts in the background, as the Android OS (starting from Android 10) does not allow apps in the background to access the clipboard.
Share Text with Another App
You can use the shareText function to share a piece of text with another app. Simply pass the value you want to share as the first argument. This will open the system's share picker where you can select which app to share into.
shareText('Hello World');Please note that the text that is shared can be at most 200000 characters long, otherwise it will be truncated.
Open another App
The openApp function allows you to open another app via its package name. If no app with the given package name is installed, an error is displayed.
openApp('com.github.android'); // Opens the GitHub appOpen a URL
This function allows you to open a URL in another app. This typically opens a browser, but it can also be used to invoke a deep-link into another app. An error message is displayed if the URL is malformed or if there is no app installed that can handle the URL.
openUrl('https://www.wikipedia.org/');Please note that this can not be used to open files.
As a second argument, you may pass the package name of the browser or app that should handle the URL. You may instead also pass "custom-tabs" or "custom-tabs([package-name])" to open the URL using a custom tab instead of a standalone browser window.
openUrl('https://example.com', 'org.mozilla.firefox');
openUrl('https://example.com', 'custom-tabs(org.mozilla.firefox)');
Send Intent
With the sendIntent function you can send an Intent, which allows you to interact with other Android apps on the same device. It takes an object as its only argument, where the object should have one or more of the properties listed in the table below. Which values to use depends on the target app, so please consult their documentation, source code or developers for more information.
| Parameter | Description | Type / Values |
|---|---|---|
| type | Defines how the intent should be sent. | 'broadcast' (default), 'activity' or 'service' |
| action | A string that specifies the generic action to perform (such as view or pick). | string |
| category | A string containing additional information about the kind of component that should handle the intent. | string |
| categories | Same as category but allows specifying multiple values. |
array of strings |
| dataUri | A URI that references the data to be acted on | string |
| dataType | The MIME type of the data | string |
| className | The full name of a class that is to be started by the Intent | string |
| packageName | The name of an application package that is to be started by the Intent | string |
| extras | An array of extras, i.e., additional parameters to be sent | array of objects (see below) |
| clearTask | Whether to set the FLAG_ACTIVITY_CLEAR_TASK flag |
boolean |
| excludeFromRecents | Whether to set the FLAG_ACTIVITY_EXCLUDE_FROM_RECENTS flag |
boolean |
| newTask | Whether to set the FLAG_ACTIVITY_NEW_TASK flag |
boolean |
| noHistory | Whether to set the FLAG_ACTIVITY_NO_HISTORY flag |
boolean |
Each extra consists of the following properties:
| Parameter | Description | Type / Values |
|---|---|---|
| name | The name of the extra | string |
| type | The type of the extra | 'string' (default), 'boolean', 'int', 'long', 'double', 'float' |
| value | The value of the extra | depends on the type |
Please note that it is unfortunately not possible to send intents that require the app to hold a specific permission, as there is no way to dynamically add such a permission to the app. This is a technical limitation that the app itself cannot address. The recommended workaround is to use a 3rd-party automation app such as Tasker to perform such actions and trigger their tasks/workflows either via an intent or via the
triggerTaskerTaskfunction (see below). Another possibility would be to fork the app, add the required permission to it and build it yourself.
Here is a generic example showing the syntax:
sendIntent({
  type: 'activity',
  action: 'my.special.action',
  packageName: 'com.example.foobar',
  className: 'com.example.foobar.MainActivity',
  extras: [
    {
      name: 'favorite_number',
      type: 'int',
      value: 42,
    },
  ],
});
The following example shows how you can use this function to open another application, in this case a browser to display a website:
sendIntent({
  type: 'activity',
  action: 'android.intent.action.VIEW',
  dataUri: 'https://example.com',
});
The above example is equivalent to calling openUrl('https://example.com').
If you want to just open a specific app without sending any data to it, you can do so by specifying the app's package name and using the android.intent.action.MAIN action. The following example will just open Google Chrome:
sendIntent({
  type: 'activity',
  action: 'android.intent.action.MAIN',
  packageName: 'com.android.chrome',
});
The above example is equivalent to calling openApp('com.android.chrome').
Trigger Tasker Task
If you have Tasker installed on your device, you can use this function to trigger one of its tasks. Pass in the name of the task as the first argument, and optionally an object containing some key-value pairs to pass along as local variables as the second argument.
triggerTaskerTask('doStuff');

triggerTaskerTask('mytask', {
  myLocalVariable: 'hello',
  andAnother: 'world',
});
Please note that you may need to manually go to the app's permissions and allow the app to run Tasker tasks for this to work, and also you will need to allow this in Tasker's settings under "Preferences > Misc > Allow External Access".
Run Termux Command
If you have Termux installed, you can use the runTermuxCommand function to run a command in a Termux terminal.
For this to work, you will need to grant the "Run commands in Termux environment" permission to the app and you will need set allow-external-apps to true in ~/.termux/termux.properties. See https://github.com/termux/termux-app/wiki/RUN_COMMAND-Intent#setup-instructions for more details.
// simple syntax
runTermuxCommand('/data/data/com.termux/files/usr/bin/top', ['-n', '5']);

// complete set of options
runTermuxCommand({
  command: '/data/data/com.termux/files/usr/bin/top',
  arguments: ['-n', '5'],
  workingDir: '/data/data/com.termux/files/home',
  resultDir: '/data/data/com.termux/files/home',
  background: false,
  sessionAction: '0',
})
It is currently not possible to pass data from Termux back to the app. As a workaround, you might be able to write data into a file and then later have the app read from that same file.
Set Wireguard Tunnel State
If you have Wireguard installed, you can use the setWireguardTunnelState function to enable or disable a tunnel. Pass in the name of the tunnel as the first argument, and as the second argument pass true to enable the tunnel or false to disable it.
setWireguardTunnelState('my-tunnel', true);For this to work, you will need to grant the app a special permission, and you will need to enable the "Allow remote control apps" setting in the Wireguard app. You might also need to exclude the Wireguard app from battery optimizations and allow it to run unrestricted.
Get Location
If you want to query your device's physical location, you can do so via the getLocation() function. It can take up to 20 seconds for the location request to complete, and it might not always be possible to determine the location.
The resulting object consists of the following fields:
| Field | Description | Type |
|---|---|---|
| status | Indicates whether a location could be determined. Will be 'success' or 'unknown' |
string |
| latitude | The latitude in degrees, or null if the location is unknown | number |
| longitude | The longitude in degrees, or null if the location is unknown | number |
| accuracy | The estimated horizontal accuracy radius in meters at the 68th percentile confidence level, or null if the location or the accuracy is unknown | number |
| coordinates | The latitude and longitude concatenated with a comma, for convenience | string |
const myLocation = getLocation();
if (myLocation.status == 'success') {
  alert(`I am currently at ${myLocation.coordinates}`);
} else {
  alert('I am so lost right now');
}
Please note that this function makes use of Google Play Services. If those are not available on the device, or if you've installed the app from F-Droid, then a fallback is used which may be less accurate, less reliable or take longer to find the location.